Getting started#
This section will guide you through the most important features of dso and show how to work with a dso project.
dso init – Initialize a project#
dso init initializes a new project in your current directory. In the context of DSO, a project is a structured
folder where input files, scripts and output files are organized and managed.
To initialize a project use the following command:
# To initialize a project called "test_project" use the following command
dso init test_project --description "This is a test project"
It creates the root directory of your project and initializes a git repository with all the necessary configuration files for git, dvc, uv and dso itself.
dso create – Add folders or stages to your project#
We consider a stage an individual step in your analysis, usually a script/notebook with defined inputs and outputs.
Stages can be organized in folders with arbitrary structures. dso create initializes folders and stages
from predefined templates. We recommend naming stages with a numeric prefix, e.g. 01_ to declare the
order of scripts, but this is not a requirement. Currently, two stage templates are available that
use either a quarto document or a bash script to conduct the analysis.
cd test_project

# Let's create a folder that we'll use to organize all analysis steps related to "RNA-seq"
dso create folder RNA_seq

# Let's create first stage for pre-processing
cd RNA_seq
dso create stage 01_preprocessing --template bash --description "Run nf-core/rnaseq"

# Let's create a second stage for quality control
dso create stage 02_qc --template quarto --description "Perform RNA-seq quality control"
Stages have the following pre-defined folder-structure. This folder system aims to make the structure coherent throughout a project for easy readability and navigation. Additional folders can still be added if necessary.
stage
  |-- input            # contains Input Data
  |-- src              # contains Analysis Script(s)
  |-- output           # contains outputs generated by Analysis Scripts
  |-- report           # contains HTML Report generated by Analysis Scripts
For more information about project and stage templates, click here.
Configuration files#
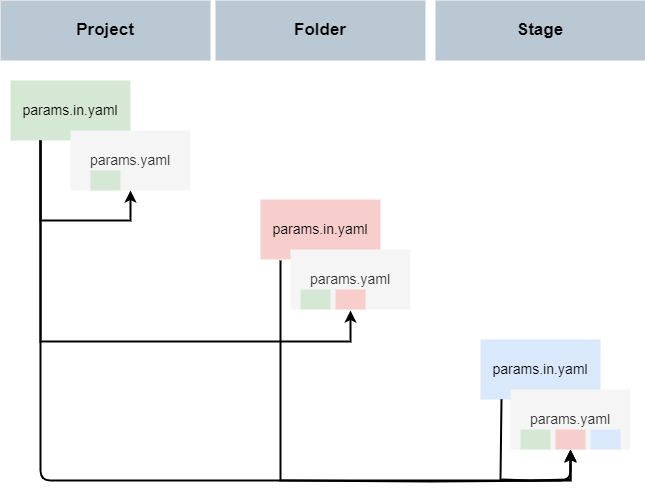
DSO proposes to put all parameters for your analysis (e.g. paths to input or output files, thresholds, etc)
in YAML-base configuration files. You can add a params.in.yaml at any level of a dso project (project, folder or stage).
By running
dso compile-config
params.in.yaml files will be compiled into params.yaml files. Compilation offers the following advantages:
inheritance: All variables defined in
params.in.yamlfiles in any parent directory will be included.templating: Variables can be composed using jinja2 syntax, e.g.
foo: "{{ bar }}_version2".path resolving: Paths will be always relative to each compiled
params.yamlfile, no matter where they were defined.
For more details, please refer to Configuration files.
Implementing a stage#
A stage is a single step in your analysis and usually generates some kind of output data from input data. The input data can also be supplied by previous stages. To create a stage, use the dso create stage command and select either the bash or one of the quarto templates as a starting-point.
The essential files of a stage are:
dvc.yaml: The DVC configuration file that defines your data pipelines, dependencies, and outputs.params.yaml: Auto-generated configuration file (never modify this by hand!).params.in.yaml: Modifiable configuration file containing stage-specific configurations.src/<stage_name>.qmd(when usingquartotemplate): A Quarto file containing your script that runs the analysis for this stage.
dvc.yaml#
The dvc.yaml file contains information about the parameters, inputs, outputs, and commands used and executes in your stage.
Variables stored in the params.yaml of a stage can be directly used within the dvc.yaml:
stages:
  01_preprocessing:
    # Parameters used in this stage, defined in params.yaml (NO need for ${...}!!)
    params:
      - dso
      - thresholds
    # Dependencies required for this stage, can be defined in params.yaml (use with ${...})
    deps:
      - src/01_preprocessing.qmd
      - ${ file_with_abs_path }
      - ${ samplesheet }

    # Outputs generated by this stage, can be defined in params.yaml (use ${ ... })
    outs:
      - output
      - report/01_preprocessing.html
Quarto Stage#
By default, a Quarto stage includes the following cmd section in the dvc.yaml file:
    # Command to render the Quarto script and move the HTML report to the report folder
    cmd:
      - dso exec quarto .
dso exec quarto provides additional features such as pre-run scripts and watermarking.
For more information see here.
Bash Stage#
A Bash stage, by default, does not include an additional script. Bash code can be directly embedded in the dvc.yaml file:
    cmd:
      - |
        bash -euo pipefail << EOF

        # add bash code here

        EOF
Accessing files and parameters from R or Python#
You can easily access files and configurations using either the DSO R-package or the Python module:
For Python, refer to the Python Usage Page.
For R, refer to the R Package Page.
dso repro – Reproducing all stages#
To execute (or reproduce, in dvc-speak) all scripts in a project, use dso repro.
dso repro is a wrapper around dvc repro that
compiles all configuration files
computes the checkums of all input files and compares them against the previously executed version
executes all stages with modified inputs
generates
dvc.lockfiles that document all input files, output files and their versions.
Several command options are available and are detailed in the dvc repro documentation. The most common usages are detailed below:
# Reproducing the whole project
dso repro

# Reproducing all stages within a specific directory
dso repro -R <path>

# Reproducing a single stage with its dependency stages
dso repro subfolder/my_stage/dvc.yaml

# Reproducing a single stage without its dependency stages
dso repro -s subfolder/my_stage/dvc.yaml

# Reproduce stage even if no changes were found
dso repro -s -f subfolder/my_stage/dvc.yaml
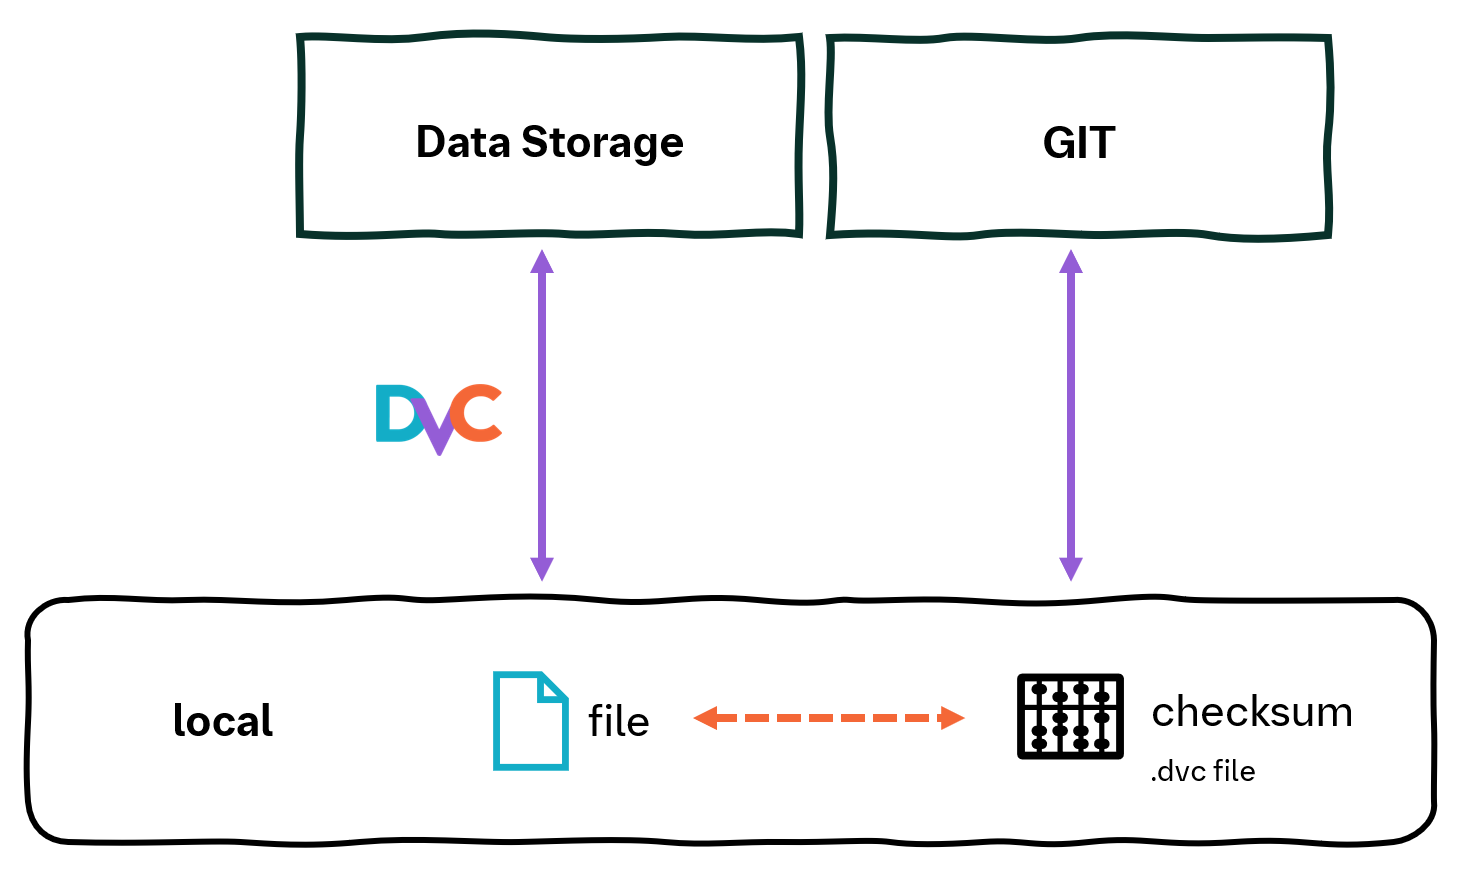
Tracking and syncing files with DVC#
Code is tracked with git as with any other project, while data is tracked by dvc and synced with a dvc remote. DVC stores .dvc or dvc.lock files in the git repository
that reference file versions associated with each commit.
In your DSO project, all outputs are automatically controlled by DVC, ensuring that your data is versioned.
When you have input data that was not generated within your pipeline, you need to add them to your DSO project.
Use dvc add to track such files with DVC. This command creates an associated .dvc file and automatically appends
the tracked file to .gitignore. The .dvc file acts as a placeholder for the original file and should be tracked by git.
This command is particularly useful when data is generated outside of your DSO project but is used within your analysis, such as metadata or preprocessed data.
# Add a file to DVC
dvc add <directoryname/filename>

# Example Usage:
dvc add metadata/external_clinical_annotation.csv
Pushing data to a remote#
To ensure your collaborators can access files you added or results you generated, you need to sync data with a dvc remote. DVC supports many backends, for instance S3 buckets, or a folder on a shared file system.
Use the dvc remote add command to specify a remote directory where the version-controlled files will be stored.
By adding the -d (default) option, dvc sets this directory as the default remote storage:
# Create a directory for storing version-controlled files
mkdir /path/on/shared/filesystem/project1/DVC_STORAGE

# Execute within the project directory to define the remote storage
dvc remote add -d <remote_name> /path/on/shared/filesystem/project1/DVC_STORAGE
After tracking your data with DVC and committing your changes locally, you need to push these changes to both the remote storage and your Git repository.
Here’s how to do it:
# Push DVC-controlled data to the remote storage
dvc push

# Commit changes to the Git repository with a descriptive message
git commit -m "Descriptive commit message"

# Push committed changes to the remote Git repository
git push
Pushing to the dvc remote can be automated using the pre-commit integration.
Pulling changes from remote#
Whenever you switch into a new stage of your git repository (e.g. by using git pull to retreive changes
from a collaborator, or by using git switch to move to another branch) you need to make sure the
corresponding data tracked by dvc is checked out as well.
The most convenient way to do so is by using
dso pull
This first compiles the configuration and then calls dvc pull internally. Running dvc pull without
compiling the configuration files first may fail.
For more details, please refer to Configuration files.